LT1 Swapped Porsche - Gauge Functionality

Hi all, I am working on a project where I have a Porsche 997 swapped with a 2016 LT1. I have everything up and running at this point with a few details to wrap up before a test drive. I’ll post a link to my build thread on Rennlist for anyone interested.

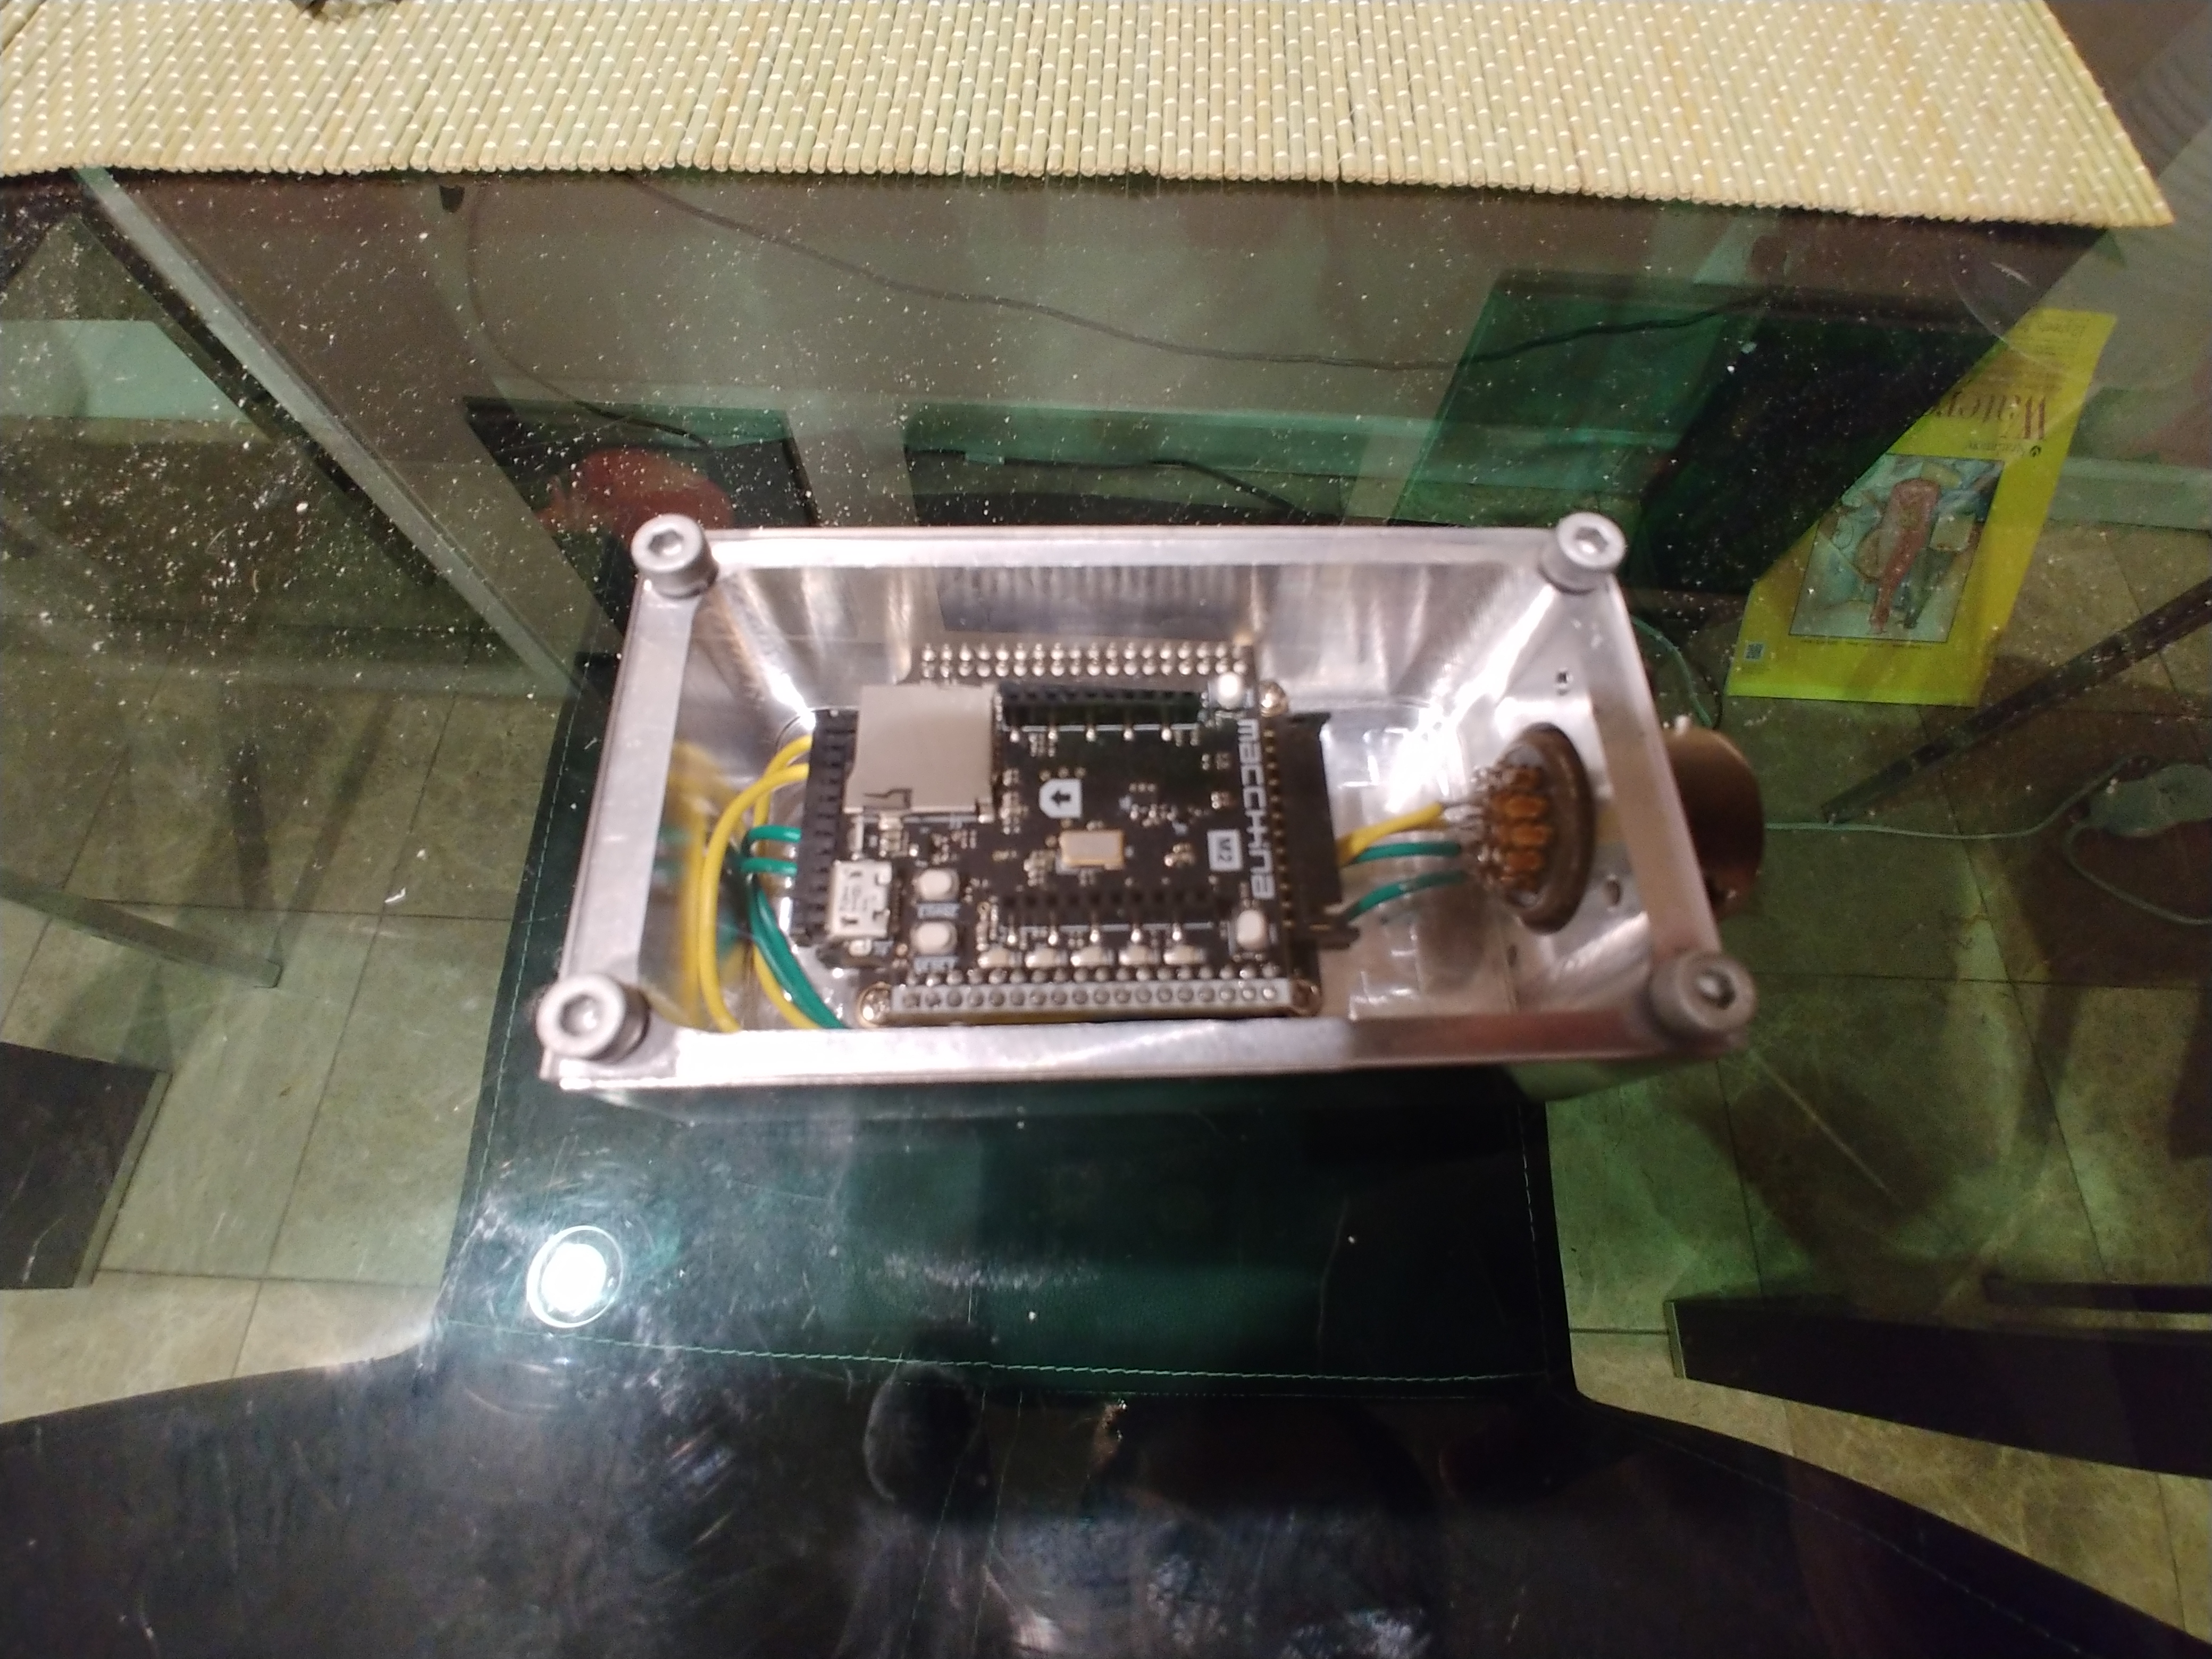
One of the things I need to do is figure out how to get my gauge cluster to work. Some have used the Porsche ECM, fed it a couple sensors, and they gets most things working. My plan is bypass that entirely, and just pass GM high speed CAN data from the GM controller to the corresponding signals on the Porsche DRIVE CANBus. Macchina M2 is my planned device for this. I am a mechanical engineer, so this is a bit of a weak area for me, but not entirely new. I just haven’t messed with Arduino much before. Another member here pointed me to this product, he used it with his LS swapped 996. I started with his code, and hack some things in here… I’m not sure if I’m even on the right track. I have a lot of learning to do obviously

Starting which his code, he was passing through everything, which is not what I need to do, so I think I need to rearrange my code a bit. I only want to pick and choose certain signals and resend them to a different message, some I will need to edit based on different scaling. RPM is the same at least, so I’m starting with that.

I didn’t include the GM frame or Porsche frame I’m referencing. Not sure if moderators don’t want those shared? I have DBC files for all signals I plan to send.

My build thread:

My code below:

//Reads all traffic on CAN0 and forwards it to CAN1 (and in the reverse direction) but modifies some frames first.
// Required libraries
#include “variant.h”
#include <due_can.h>

#include <Arduino.h>
#include <pins_arduino.h>
#include <stdint.h>

#include “M2_IO.h”
#include <M2_12VIO.h>

M2_12VIO M2IO; //Constructor for the M2_12Vio library

//Leave defined if you use native port, comment if using programming port
#define Serial SerialUSB

void setup()
{

Serial.begin(115200);

M2IO.Init_12VIO(); // Initialise the M2I/O library
M2IO.Setpin_12VIO(1, ON, SOURCE);
pinMode(Led5, OUTPUT); // Set the RED LED PIN as an OUTPUT to enable flasing or Flash ERROR Condition
digitalWrite(Led5, LOW); // turn the RED LED ON by making the PIN LOW

// Initialize CAN0 and CAN1, Set the proper baud rates here
Can0.begin(CAN_BPS_500K);
Can1.begin(CAN_BPS_500K);

//By default there are 7 mailboxes for each device that are RX boxes
//This sets each mailbox to have an open filter that will accept extended
//or standard frames
int filter;
//extended
for (filter = 0; filter < 3; filter++) {
Can0.setRXFilter(filter, 0, 0, true);
Can1.setRXFilter(filter, 0, 0, true);
}
//standard
for (int filter = 3; filter < 7; filter++) {
Can0.setRXFilter(filter, 0, 0, false);
Can1.setRXFilter(filter, 0, 0, false);
}

int RPM = 0;
}

void printFrame(CAN_FRAME &frame) {
Serial.print(“ID: 0x”);
Serial.print(frame.id, HEX);
Serial.print(" Len: “);
Serial.print(frame.length);
Serial.print(” Data: 0x");
for (int count = 0; count < frame.length; count++) {
Serial.print(frame.data.bytes[count], HEX);
Serial.print(" “);
}
Serial.print(”\r\n");
}

void loop(){

CAN_FRAME incoming;

if (Can0.available() > 0) {
Can0.read(incoming);
if (incoming.id == 0xFF) {
printFrame(incoming);
RPM = incoming.data.bytes[1]};
}
myFrame.id = 0xFF;
myFrame.length = 8
myFrame.data[2] = RPM;
Can1.sendFrame(myFrame);
}

This is the signal I am trying to implement for CAN1, not sure if I set it up right at all (again, frame held out). I believe 18 is a typo, it starts at bit 16 in the other DBC file I have, so I have this entered in as the 3rd byte (2) for where it writes to.

EngineSpeed

I think the first thing I need to do is set this code up not as a pass through for all messages, but rather to filter out certain messages. It seems all the good stuff I need (tach, oil pressure, coolant, idiot lights, etc) is on 4 or so frames from the GM ECU, and received by the same number on the Porsche side. I’m trying to find examples of people using the due_can setup to better understand the functionality or how to properly set it up.

So what I did was setup a filter.

//By default there are 7 mailboxes for each device that are RX boxes

//This sets up filtering to look for the messages needed to run a gauge cluster Can0 is the Engine side, Can1 is the Porsche side
int filter;
//extended
for (filter = 0; filter < 3; filter++) {
Can0.setRXFilter(filter, 0xFF, 0, true);

//At this time, no messages going from Porsche to GM so comment out
//Can1.setRXFilter(filter, 0, 0, true);
}

//If Standard frames, enter below
//standard
//for (int filter = 3; filter < 7; filter++) {
//Can0.setRXFilter(filter, 0, 0, false);
//Can1.setRXFilter(filter, 0, 0, false);

So now only frame FF is passing through. I have nothing going from Porsche to GM right now, I think I will end up passing a few items though in the end (vehicle speed, sport mode? - it would be sweet to get active rev matching functional).

The later section of code I think should be setup differently now. No need for an if statement I guess.

CAN_FRAME incoming;

if (Can0.available() > 0) {
Can0.read(incoming);
if (incoming.id == 0xFF) {
printFrame(incoming);
RPM = incoming.data.bytes[1]};
}
myFrame.id = 0x105;
myFrame.length = 8
myFrame.data[2] = RPM;
Can1.sendFrame(myFrame);
}

Sorry, I’m very new to messing with Arduino. My job (calibrator for one of the Big Three) has me reading lots of code, never writing.

Also, as I look at my DBC files, I realize engine speed is on two frames in both. So I need to set that up. I believe one is little endian and one is big endian. That stuff I can sort out later.

I have my M2 now. I made a code that sends on CAN1 some random numbers to run the tach and it works! CAN0 I have setup to monitor CAN1bus as well to verify my message goes out. Next step will be getting RPM from the engine to my outgoing signal.

Two questions… is there something I am doing wrong for power. I have the Under the Hood version. I have 12V to pin23 and ground to Pin 12. I only get the board to power on if I have USB plugged in… Are there more spots that need power/ground?
EDIT: Figured this one out. Ground needs to go to the digital ground (any of them?) as well.

Using due_can, to write to certain bytes, I can use, "myFrame.data.byte[1], can I do something similar with individual bits? For example, in my case, the first 7 bits of byte one send accelerator pedal. Bit 8 is an engine running flag.

Man, this is a great project @superman22x! I’d love to see a video of your tach moving or whatever else you want to show off.

Regarding powering UTD - I think you’ve got it. Pin 23V gets 12V and and of the DGND pins get GND.

https://docs.macchina.cc/m2-docs/detailed-reference/installation#under-the-hood-uth

@CollinK - can you point us at any examples that shows changing/sending individual bits?

Sure! I’ll try and grab something in the next couple days! Hoping to take it for a drive soon.

I found a way to manipulate individual bits by using bitSet(x,n). But for example one signal starts at bit 0 Byte 0 and is 10 bits long. Or another starts on Bit 7 of byte 5 and is 8 bits long. It seems odd, but I’m pretty certain on these…

If you’re really up to date with due_can and can_common then there is built-in bit manipulation. If you have a CAN_FRAME object like so:

CAN_FRAME myFrame;

Then you can do this:

myFrame.bit[3] = 1;

But, that’s rather tedious when you need to set, say, 10 bits. Let’s say you know that RPM is stored across 12 bits, all 8 in the first byte (so 0-7) and the lower 4 of the next byte in the frame (8-12). This would then be spread across myFrame.data.byte[0] and myFrame.data.byte[1]. What if other stuff is stored in the upper 4 bits of that second byte, byte[1]? You could do something like this:

uint16_t RPM = 2000;
CAN_FRAME frame;
Can0.read(frame);
frame.data.byte[0] = RPM & 0xFF; //lower 8 bits of the RPM
frame.data.byte[1] = (frame.data.byte[1] & 0xF0) | ( (RPM >> 8) & 0xF );
Can1.sendFrame(frame);

Now, that includes a rather nasty line. Here it is broken down with comments:

frame.data.byte[1] = frame.data.byte[1] & 0xF0; //zero out the bottom 4 bits but leave the top 4 alone
uint8_t valu = RPM >> 8; //shift RPM down 8 bits so we're left with just the top 8 but shifted down to where the lower 8 used to be
valu = valu & 0xF; //keep only the lower 4 bits of those 8, zeroes out the upper 4
frame.data.byte[1] = frame.data.byte[1] | valu; //form a composite of the existing upper 4 bits plus the new lower 4 bits from valu

So, that’s basically how you compose a series of bits that fall within two or more bytes in the message. Is it confusing? Very much so. Believe me, it took me a lot of work to create the DBC code in SavvyCAN because of how confusing this all is. It gets easier with time. You just have to take it slowly and work through it. Basically the idea is to use & which is “AND” to mask away bits you are about to change. Then use | which is “OR” to compose new bits into those positions.

This is extremely helpful, thank you! I think I can figure it out with some testing. Takes me a few tries usually, then it clicks

I’m a little stuck on something… Trying to use what you showed to do this. I have a value, torque, that comes in on all of Byte[3] and the lower of byte[4]. So in total it’s a 12 bit number. I then need to multiply and offset it to get it to the correct scale for the Porsche output. Once I have that final number, I send it out as only an 8 bit message.

I keep getting Low and High bits mixed up. But here is my example, am I going in the write direction here?

EngTorqL=incoming.data.bytes[3];
EngTorqH=incoming.data.bytes[4];

EngTorqH = EngTorqH & 0xF0;
EngTorqH = EngTorqH >> 4;
EngTorq=EngTorqL | EngTorqH ; //EngTorq assigned as int earlier

EDIT: I may have figured out… something? It seems to work. The above did not. I made EngTorq a uint16_t as well. Does changing EngTorqL from a byte to uint16_t cause problems?

EngTorq = ((uint16_t)EngTorqL << 4) | ((EngTorqH & 0xF0) >> 4);

Couple updates, made a nice box for the M2. Used an Amphenol connector… because why not. I’m a little afraid the stock M2 24 and 26 pin connector will not last long, we’ll see…

My CAN system works great, I have full gauge functionality now. I may dig further to see about getting traction control working.

I used the 12VIO system to trigger my electric powersteering pump as well. For now, it’s set to go as soon as the M2 turns on, but I will implement a trigger based on engine running next.

The next hurdle however, is that the M2 boots too slow relative to the rest of the car, so warning lights already trigger and the fans go into max run before the M2 starts sending out CAN messages. I have the M2 set to trigger on key on, but I think I may need to find another solution. Maybe door opening? Or maybe running all the time… I would just be afraid to kill the battery if it’s parked over a few weeks or more. Porsche has that left side ignition for Le Mans starts, so even with door open triggering it, I need to be careful! Haha.


Very cool. Glad to hear it is working! Any chance you could take a little video? I’m very curious.

As far as triggers I know we have done a few projects where the hardware comes out of sleep mode on CAN activity. Like unlocking the doors as you approach the car. I’m not sure if we have done this with M2 specifically though.

I wonder if a wakeup scenario would be fast enough vs a full boot cycle. It looks like a couple systems wake up when the key is inserted, so if I can trigger it off that, that would be ideal. Sleep could be setup to trigger based on not receiving a CAN message from either Porsche or GM side in X amount of time.

I’ll try and grab a quick video soon.

Stuck on using the sleep functions… It seems only the analog pins are mapped to the connectors on the M2 board. I believe only digital pins can be used as an interrupt function on the Due if I were to use a sleep mode. Any other ideas here?

I found some old threads that started working on low power modes, but I couldn’t find any completed project info… I am at around 110mA with my M2 now. Way too high to leave it idle. From applying power to turning on the LED from my setup code, it looks like 2-3seconds. If anyone has any solutions, I would be very interested.

One idea I have is to use an Arduino Nano or similar minimal board to trigger a relay. It seems the Nano uses less than 1mA in sleep mode. I have a trigger wire that is used to “Wake” the radio, instrument cluster, etc when the door is opened. I tried to use this to power the M2 directly, but it is not meant for that. It might work to power a very low powered coil instead of a trigger on something like the Nano.

Interesting new development today… For the time being, I switched the M2 back to a constant 12V source (I keep my car on a tender now anyway, and it likely won’t be driven anywhere until spring). When the car is off, the 12V IO system is on. As soon as I key on, the 12V IO system turns off. The 12V input drops from ~12.3V to 12.0V when the key is turned (no crank) as some other systems in the car put some demand on the system. For whatever reason, my car is triggering something to shut the 12V IO system off. Does a slight voltage drop do that? I’m going to dig into that.

This stems back to my other thread on getting the 12V IO system to work.

I flashed the M2_IO example script to see what it would do. It appears my M2 12V IO is shutting down due to an over current trip. This only happens if it is plugged into the vehicles 12V source. Also, 76mA shouldn’t be triggering an over current? I’m confused on this. It happens when the key is put to the acc mode, or any other load change on the battery. Just to confirm I wasn’t doing something else dumb, I powered the M2 with a 9V battery and removed only the vehicle power source from the equation. Problem gone.

In addition, I had the same issue before when the 26 pin connector was not connected at all. I’m assuming the slight change in vehicle voltage is somehow causing issues with the overcurrent detection.

OverCurrent

Here’s a video I’ve been promising. Apparently my oil pressure gauge isn’t working again… I must have goobered something when I “cleaned” my code up. The PSM failure etc goes away when I drive, it comes up if the battery gets disconnected.

I’ve been working on power solutions still. I found a 12V trigger that turns on when the door opens, but it doesn’t power the M2. I’m thinking a mosfet triggered by the 12V source is the way to go.

Very cool! I will ask around on what low power/fast boot options you might have.

Thanks! I made a thread on the fast boot stuff. I figured that might be of interest to others, so I thought a standalone thread would be good.

1 Like

I see that, good idea. Let me know if you want some of your older posts moved over there.

So for now I have a good alternative on power. Since my wake up signal is 12V, and I need a full 12V to the M2, I decided to use a pair of MOSFETs like the below diagram as suggested on the Arduino forum. It worked great! I’ve never used Mosfets before, but I’m a fan now, simple. Wakeup triggers off of door opening. That turns off if you were to not insert the key within a short time. But it retriggers off of the key being inserted, and stays on once the car is on.

I finally made a GitHub posting. I changed my code to simply use the OBD PIDs to function, so that I can share it without any worries of sharing GM CANbus. I’m pretty excited to be able to share this, it’s enough to get the basics working! Unfortunately, I don’t think Oil pressure or Oil Temp come across the OBD PIDs.

Awesome work! We are going to feature this in the next newsletter.